| 2022 | 您所在的位置:网站首页 › unity 序列化 › 2022 |
2022
|
文章目录
一、XML 序列化二、XML 反序列化三、IXmlSerializable 接口四、Dictionary 支持序列化与反序列化五、自定义 XML 数据管理类
一、XML 序列化
序列化:把对象转化为可传输的字节序列过程称为序列化,就是把想要存储的内容转换为字节序列用于存储或传递 反序列化:把字节序列还原为对象的过程称为反序列化,就是把存储或收到的字节序列信息解析读取出来使用 (一)XML 序列化 准备数据结构 public class Lesson1Test { public int testPublic = 10; private int testPrivate = 11; protected int testProtected = 12; internal int testInternal = 13; public string testPUblicStr = "123"; public int testPro { get; set; } public Lesson1Test2 testClass = new Lesson1Test2(); public int[] arrayInt = new int[3] { 5, 6, 7 }; public List listInt = new List() { 1, 2, 3, 4 }; public List listItem = new List() { new Lesson1Test2(), new Lesson1Test2() }; // 不支持字典 // public Dictionary testDic = new Dictionary() { { 1, "123" } }; } public class Lesson1Test2 { public int test1 = 1; public float test2 = 1.1f; public bool test3 = true; } Lesson1Test lt = new Lesson1Test();进行序列化 XmlSerializer:用于序列化对象为 xml 的关键类 StreamWriter:用于存储文件 using:用于方便流对象释放和销毁 using System.Xml.Serialization; // 第一步:确定存储路径 string path = Application.persistentDataPath + "/Lesson1Test.xml"; // 第二步:结合 using知识点 和 StreamWriter这个流对象 来写入文件 // 括号内的代码:写入一个文件流 如果有该文件 直接打开并修改 如果没有该文件 直接新建一个文件 // using 的新用法 括号当中包裹的声明的对象 会在 大括号语句块结束后 自动释放掉 // 当语句块结束 会自动帮助我们调用 对象的 Dispose这个方法 让其进行销毁 // using一般都是配合 内存占用比较大 或者 有读写操作时 进行使用的 using (StreamWriter stream = new StreamWriter(path)) { // 第三步:进行xml文件序列化 XmlSerializer s = new XmlSerializer(typeof(Lesson1Test)); // 这句代码的含义 就是通过序列化对象 对我们类对象进行翻译 将其翻译成我们的xml文件 写入到对应的文件中 // 第一个参数:文件流对象 // 第二个参数:想要备翻译 的对象 // 注意:翻译机器的类型 一定要和传入的对象是一致的 不然会报错 s.Serialize(stream, lt); }运行测试 运行后可以看到如下的文件内容(在 path 文件夹中查看) 可以发现,只能保存 public 类型的数据 10 123 1 1.1 true 5 6 7 1 2 3 4 1 1.1 true 1 1.1 true 0 自定义节点名或设置属性 public class Lesson1Test { [XmlElement("testPublic123123")] // 将该变量对应的结点名字改为 "testPublic123123" public int testPublic = 10; private int testPrivate = 11; protected int testProtected = 12; internal int testInternal = 13; public string testPUblicStr = "123"; public int testPro { get; set; } public Lesson1Test2 testClass = new Lesson1Test2(); public int[] arrayInt = new int[3] { 5, 6, 7 }; [XmlArray("IntList")] // 改变数组对应的结点名字 [XmlArrayItem("Int32")] // 改变数组成员对应的结点名字 public List listInt = new List() { 1, 2, 3, 4 }; public List listItem = new List() { new Lesson1Test2(), new Lesson1Test2() }; // 不支持字典 // public Dictionary testDic = new Dictionary() { { 1, "123" } }; } public class Lesson1Test2 { [XmlAttribute("Test1")] // 将该变量存储为XML属性,并改名为 "Test1" public int test1 = 1; [XmlAttribute] // 将该变量存储为XML属性 public float test2 = 1.1f; [XmlAttribute] public bool test3 = true; } 10 123 5 6 7 1 2 3 4 0 总结: 序列化流程 有一个想要保存的类对象使用 XmlSerializer 序列化该对象通过 StreamWriter 配合 using 将数据存储 写入文件 注意: 只能序列化公共成员不支持字典序列化可以通过特性修改节点信息或者设置属性信息Stream 相关要配合 using 使用 二、XML 反序列化(一)判断文件是否存在 using System.IO; string path = Application.persistentDataPath + "/Lesson1Test.xml"; if(File.Exists(path)) { ... }(二)反序列化 关键知识: using 和 StreamReaderXmlSerializer 的 Deserialize 反序列化方法 using System.Xml.Serialization; // 读取文件 using (StreamReader reader = new StreamReader(path)) { // 产生了一个 序列化反序列化的翻译机器 XmlSerializer s = new XmlSerializer(typeof(Lesson1Test)); Lesson1Test lt = s.Deserialize(reader) as Lesson1Test; } 运行后调试,可以发现 List 类型的内容被重复添加,原因是变量 lt 初始化后, List 中有默认值,而反序列化时,Deserialize 方法会往 List 中用 Add 方法添加值,而不是覆盖原有的值。 
总结: 判断文件是否存在 File.Exists() 文件流获取 StreamReader reader = new StreamReader(path) 根据文件流 XmlSerializer 通过 Deserialize 反序列化出对象 注意:List 对象如果有默认值,反序列化时不会清空,会往后面添加 三、IXmlSerializable 接口 C# 的 XmlSerializer 提供了可拓展内容,可以让一些不能被序列化和反序列化的特殊类能被处理 让特殊类继承 IXmlSerializable 接口,实现其中的方法即可 (一)回顾序列化与反序列化 using System.IO; using System.Xml; using System.Xml.Serialization; public class TestLesson3 : IXmlSerializable { public int test1; public string test2; } TestLesson3 t = new TestLesson3(); t.test2 = "123"; string path = Application.persistentDataPath + "/TestLesson3.xml"; // 序列化 using (StreamWriter writer = new StreamWriter(path)) { // 序列化"翻译机器" XmlSerializer s = new XmlSerializer(typeof(TestLesson3)); // 在序列化时 如果对象中的引用成员 为空 那么xml里面是看不到该字段的 s.Serialize(writer, t); } // 反序列化 using (StreamReader reader = new StreamReader(path)) { // 序列化"翻译机器" XmlSerializer s = new XmlSerializer(typeof(TestLesson3)); TestLesson3 t2 = s.Deserialize(reader) as TestLesson3; } 0 123(二)继承 IXmlSerializable 接口 继承接口并实现接口函数 public class TestLesson3 : IXmlSerializable { public int test1; public string test2; // 返回结构,返回 null 即可,不用过多了解 public XmlSchema GetSchema() { return null; } // 反序列化时 会自动调用的方法 public void ReadXml(XmlReader reader) { } // 序列化时 会自动调用的方法 public void WriteXml(XmlWriter writer) { } } WriteXml public void WriteXml(XmlWriter writer) { // 在里面可以自定义序列化 的规则 // 如果要自定义 序列化的规则 一定会用到 XmlWriter中的一些方法 来进行序列化 // 1.写属性 writer.WriteAttributeString("test1", this.test1.ToString()); writer.WriteAttributeString("test2", this.test2); // 2.写节点 writer.WriteElementString("test1", this.test1.ToString()); writer.WriteElementString("test2", this.test2); // 3.写包裹节点 XmlSerializer s = new XmlSerializer(typeof(int)); writer.WriteStartElement("test1"); // 写 s.Serialize(writer, test1); // 用序列化翻译机器写 test1 的内容 writer.WriteEndElement(); // 写 XmlSerializer s2 = new XmlSerializer(typeof(string)); writer.WriteStartElement("test2"); // 写 s.Serialize(writer, test2); // 用序列化翻译机器写 test2 的内容 writer.WriteEndElement(); // 写 } ReadXml public void ReadXml(XmlReader reader) { // 在里面可以自定义反序列化 的规则 // 1.读属性 this.test1 = int.Parse(reader["test1"]); this.test2 = reader["test2"]; // 2.读节点 // 方式一 reader.Read(); // 这时是读到的test1节点 reader.Read(); // 这时是读到的test1节点包裹的内容 0 this.test1 = int.Parse(reader.Value); // 得到当前内容的值= reader.Read(); // 这时读到的是尾部包裹节点 reader.Read(); // 这时是读到的test2节点 reader.Read(); // 这时是读到的test2节点包裹的内容 123 this.test2 = reader.Value; // 方式二 while (reader.Read()) { if (reader.NodeType == XmlNodeType.Element) { switch (reader.Name) { case "test1": reader.Read(); this.test1 = int.Parse(reader.Value); break; case "test2": reader.Read(); this.test2 = reader.Value; break; } } } // 3.读包裹元素节点 XmlSerializer s = new XmlSerializer(typeof(int)); XmlSerializer s2 = new XmlSerializer(typeof(string)); reader.Read(); // 跳过根节点 reader.ReadStartElement("test1"); // 读 test1 = (int)s.Deserialize(reader); // 用反序列化翻译机器读 test1 的内容 reader.ReadEndElement(); // 读 reader.ReadStartElement("test2"); // 读 test2 = s2.Deserialize(reader).ToString(); // 用反序列化翻译机器读 test2 的内容 reader.ReadEndElement(); // 读 } 四、Dictionary 支持序列化与反序列化我们没办法修改 C# 自带的类 那我们可以重写一个类继承 Dictionary,然后让这个类继承序列化拓展接口 IXmlSerializable 实现里面的序列化和反序列化方法即可 public class SerizlizedDictionary : Dictionary, IXmlSerializable { public XmlSchema GetSchema() { return null; } // 自定义字典的 反序列化 规则 public void ReadXml(XmlReader reader) { XmlSerializer keySer = new XmlSerializer(typeof(TKey)); XmlSerializer valueSer = new XmlSerializer(typeof(TValue)); // 要跳过根节点 reader.Read(); // 判断 当前不是元素节点 结束 就进行 反序列化 while (reader.NodeType != XmlNodeType.EndElement) { // 反序列化键 TKey key = (TKey)keySer.Deserialize(reader); // 反序列化值 TValue value = (TValue)valueSer.Deserialize(reader); // 存储到字典中 this.Add(key, value); } } // 自定义 字典的 序列化 规则 public void WriteXml(XmlWriter writer) { XmlSerializer keySer = new XmlSerializer(typeof(TKey)); XmlSerializer valueSer = new XmlSerializer(typeof(TValue)); foreach (KeyValuePair kv in this) { // 键值对 的序列化 keySer.Serialize(writer, kv.Key); valueSer.Serialize(writer, kv.Value); } } }(一)序列化测试 public class TestLesson4 { public int test1; public SerizlizerDictionary dic; } public class Lesson4 : MonoBehaviour { // Start is called before the first frame update void Start() { TestLesson4 tl4 = new TestLesson4(); tl4.dic = new SerizlizerDictionary(); tl4.dic.Add(1, "123"); tl4.dic.Add(2, "234"); tl4.dic.Add(3, "345"); string path = Application.persistentDataPath + "/TestLesson4.xml"; using (StreamWriter writer = new StreamWriter(path)) { XmlSerializer s = new XmlSerializer(typeof(TestLesson4)); s.Serialize(writer, tl4); } } } 0 1 123 2 234 3 345(二)反序列化测试 void Start() { TestLesson4 tl4 = new TestLesson4(); using (StreamReader reader = new StreamReader(path)) { XmlSerializer s = new XmlSerializer(typeof(TestLesson4)); tl4 = s.Deserialize(reader) as TestLesson4; } }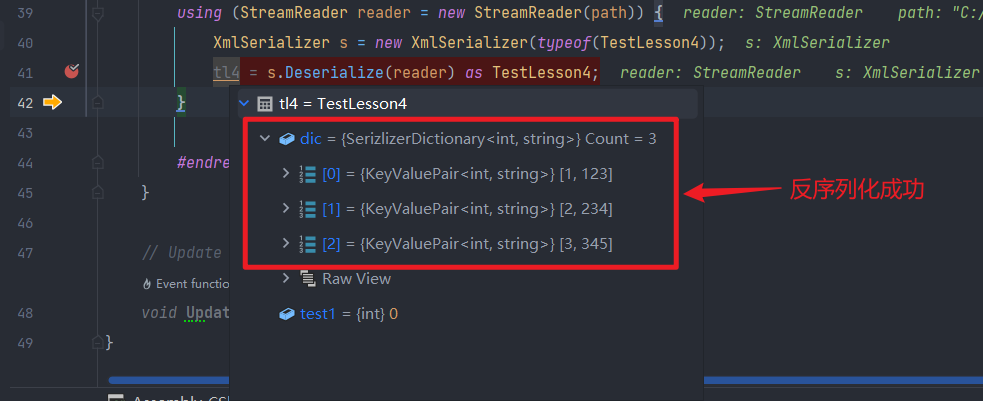 五、自定义 XML 数据管理类
using System;
using System.IO;
using System.Xml.Serialization;
using UnityEngine;
public class XmlDataMgr
{
// 单例模式
public static XmlDataMgr Instance { get; } = new XmlDataMgr();
// 防止外部实例化该管理类
private XmlDataMgr() { }
///
/// 保存数据到xml文件中
///
/// 数据对象
/// 文件名
public void SaveData(object data, string fileName) {
// 1.得到存储路径
string path = Application.persistentDataPath + "/" + fileName + ".xml";
// 2.存储文件
using (StreamWriter writer = new StreamWriter(path)) {
// 3.序列化
XmlSerializer s = new XmlSerializer(data.GetType());
s.Serialize(writer, data);
}
}
///
/// 从xml文件中读取内容
///
/// 对象类型
/// 文件名
///
public object LoadData(Type type, string fileName) {
// 1.首先要判断文件是否存在
string path = Application.persistentDataPath + "/" + fileName + ".xml";
if (!File.Exists(path)) {
path = Application.streamingAssetsPath + "/" + fileName + ".xml";
if (!File.Exists(path)) {
// 如果根本不存在文件 两个路径都找过了
// 那么直接new 一个对象 返回给外部 无非 里面都是默认值
return Activator.CreateInstance(type);
}
}
// 2.存在就读取
using (StreamReader reader = new StreamReader(path)) {
// 3.反序列化 取出数据
XmlSerializer s = new XmlSerializer(type);
return s.Deserialize(reader);
}
}
}
if (!File.Exists(path)) {
path = Application.streamingAssetsPath + "/" + fileName + ".xml";
if (!File.Exists(path)) {
// 如果根本不存在文件 两个路径都找过了
// 那么直接new 一个对象 返回给外部 无非 里面都是默认值
return Activator.CreateInstance(type);
}
}
// 2.存在就读取
using (StreamReader reader = new StreamReader(path)) {
// 3.反序列化 取出数据
XmlSerializer s = new XmlSerializer(type);
return s.Deserialize(reader);
}
}
}
五、自定义 XML 数据管理类
using System;
using System.IO;
using System.Xml.Serialization;
using UnityEngine;
public class XmlDataMgr
{
// 单例模式
public static XmlDataMgr Instance { get; } = new XmlDataMgr();
// 防止外部实例化该管理类
private XmlDataMgr() { }
///
/// 保存数据到xml文件中
///
/// 数据对象
/// 文件名
public void SaveData(object data, string fileName) {
// 1.得到存储路径
string path = Application.persistentDataPath + "/" + fileName + ".xml";
// 2.存储文件
using (StreamWriter writer = new StreamWriter(path)) {
// 3.序列化
XmlSerializer s = new XmlSerializer(data.GetType());
s.Serialize(writer, data);
}
}
///
/// 从xml文件中读取内容
///
/// 对象类型
/// 文件名
///
public object LoadData(Type type, string fileName) {
// 1.首先要判断文件是否存在
string path = Application.persistentDataPath + "/" + fileName + ".xml";
if (!File.Exists(path)) {
path = Application.streamingAssetsPath + "/" + fileName + ".xml";
if (!File.Exists(path)) {
// 如果根本不存在文件 两个路径都找过了
// 那么直接new 一个对象 返回给外部 无非 里面都是默认值
return Activator.CreateInstance(type);
}
}
// 2.存在就读取
using (StreamReader reader = new StreamReader(path)) {
// 3.反序列化 取出数据
XmlSerializer s = new XmlSerializer(type);
return s.Deserialize(reader);
}
}
}
if (!File.Exists(path)) {
path = Application.streamingAssetsPath + "/" + fileName + ".xml";
if (!File.Exists(path)) {
// 如果根本不存在文件 两个路径都找过了
// 那么直接new 一个对象 返回给外部 无非 里面都是默认值
return Activator.CreateInstance(type);
}
}
// 2.存在就读取
using (StreamReader reader = new StreamReader(path)) {
// 3.反序列化 取出数据
XmlSerializer s = new XmlSerializer(type);
return s.Deserialize(reader);
}
}
}
|
【本文地址】